
Hier kommt ein kurzer Guide wie man ein Site-to-Site VPN zwischen einer FortiGate Firewall und einer AVM FRITZ!Box aufbaut. Anhand von Screenshots zeige ich die Einrichtung der FortiGate, während ich für die FRITZ!Box ein Template der *.cfg Konfigurationsdatei bereitstelle.
Labor
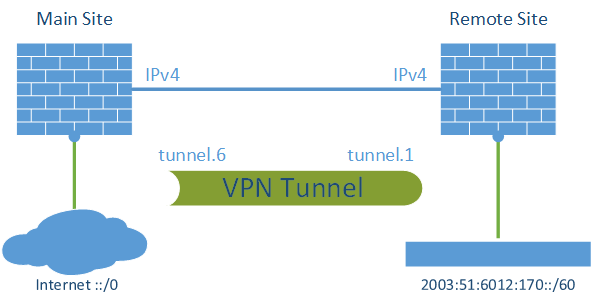
Mein Labor sah wie folgt aus:

Die FRITZ!Box ist eine 7390 mit FRITZ!OS 06.30, während die Fortinet Firewall eine FortiWiFi 90D mit Version 5.2.2 ist. Wie im Internet üblich ist die FortiGate mit einer statischen IP-Adresse versehen (obgleich 1 zu 1 geNATet), während sich die FRITZ!Box hinter einer dynamischen IP verbirgt. Mit einem dynamischen DNS Dienst ist immerhin ein FQDN für die FRITZ!Box verfügbar.
Sehr praktisch bei FortiOS ist ja, dass bei IKE auch dann der Main Mode verwendet werden kann, wenn die Gegenstelle lediglich über eine dynamische IP (mit einem DynDNS Namen) verfügt. Sprich: Es ist nicht der Aggressive Mode nötig, um ein VPN zu bauen, und vorallem kann der Tunnelaufbau auch von der FortiGate selbst initiiert werden. (Exakt vergleichbar mit der Juniper SSG, die das genau so kann, siehe hier.)
FortiGate
Folgende Schritte sind seitens der FortiGate nötig. In den Beschriftungen unterhalb der Screenshots stehen weitere Details:


FRITZ!Box
Für die FRITZ!Box muss folgendes Template angepasst werden. Gelb markiert sind all die Zeilen, die zwingend angepasst werden müssen. Die Proposals für Phase 1 und 2 können natürlich auch anders gewählt werden, solange das Pendant bei der FortiGate stimmt (siehe hier für mehr Details bezüglich der Proposals der FRITZ!Box).
Hinweis: Dieses Template unterscheidet sich in einer Kleinigkeit von quasi allen anderen Templates, die hier auf meinem Blog sind: Es ist sowohl die localid als auch die remoteid vom Typ “fqdn”. In vielen anderen Beispielen habe ich hier bei der remoteid den Typ “ipaddr” gehabt. Dieser lässt sich auf der FortiGate leider nicht einstellen, da dort unter Verwendung einer IP-Adresse trotzdem ein String versendet wird. Daher ist hier bei der FRITZ!Box zwingend der fqdn nötig.
vpncfg {
        connections {
                enabled = yes;
                conn_type = conntype_lan;
                name = "fortigate-vpn";
                always_renew = yes;
                reject_not_encrypted = no;
                dont_filter_netbios = yes;
                localip = 0.0.0.0;
                local_virtualip = 0.0.0.0;
                remoteip = 80.154.108.233;
                remote_virtualip = 0.0.0.0;
                localid {
                        fqdn = "fritzbox.webernetz.net";
                }
                remoteid {
                        fqdn = "blubb";
                }
                mode = phase1_mode_idp;
                phase1ss = "dh14/aes/sha";
                keytype = connkeytype_pre_shared;
                key = "RX-2RUz2UKpFiPXi6B6DJss5TWbW-DzvTMwc";
                cert_do_server_auth = no;
                use_nat_t = no;
                use_xauth = no;
                use_cfgmode = no;
                phase2localid {
                        ipnet {
                                ipaddr = 192.168.29.0;
                                mask = 255.255.255.0;
                        }
                }
                phase2remoteid {
                        ipnet {
                                ipaddr = 192.168.161.0;
                                mask = 255.255.255.0;
                        }
                }
                phase2ss = "esp-aes256-3des-sha/ah-no/comp-lzs-no/pfs";
                accesslist = "permit ip any 192.168.161.0 255.255.255.0";
        }  ike_forward_rules =	"udp 0.0.0.0:500 0.0.0.0:500",
								"udp 0.0.0.0:4500 0.0.0.0:4500";
	}
Es läuft …
wenn es grün leuchtet. 


Wer mehr Infos zur VPN-Verbindung möchte, kann auf der FortiGate zum Beispiel mit den folgenden Befehlen Details herausfinden:
fd-wv-fw04 # get vpn ike gateway fritzbox

vd: root/0
name: fritzbox
version: 1
interface: wan1 6
addr: 172.16.1.6:500 -> 77.1.138.66:500
created: 1484s ago
peer-id: fritzbox.webernetz.net
peer-auth: no
IKE SA  created: 1/1  established: 1/1  time: 2260/2260/2260 ms
IPsec SA  created: 1/1  established: 1/1  time: 2190/2190/2190 ms

  id/spi: 27873 c0946dbb7e367bbf/98f5902234833225
  direction: initiator
  status: established 1484-1482s ago = 2260ms
  proposal: aes-256-sha1
  key: c24d006dcddd88db-561bdd168fb5ece9-fd87c497587cb16c-b0ccbb1302b38310
  lifetime/rekey: 3600/1817
  DPD sent/recv: 00016e13/00000000

fd-wv-fw04 #
fd-wv-fw04 #
fd-wv-fw04 # get vpn ipsec tunnel name fritzbox

gateway
  name: 'fritzbox'
  type: route-based
  local-gateway: 172.16.1.6:0 (static)
  remote-gateway: 77.1.138.66:0 (static)
  mode: ike-v1
  interface: 'wan1' (6)
  rx  packets: 2  bytes: 236  errors: 0
  tx  packets: 2  bytes: 168  errors: 3
  dpd: enabled/negotiated  idle: 5000ms  retry: 3  count: 0
  selectors
    name: 'fritzbox'
    auto-negotiate: disable
    mode: tunnel
    src: 0:192.168.161.0/255.255.255.0:0
    dst: 0:192.168.29.0/255.255.255.0:0
    SA
      lifetime/rekey: 3600/2121
      mtu: 1438
      tx-esp-seq: 3
      replay: enabled
      inbound
        spi: c97b3074
        enc:     aes  2cdc2d66d55ce60a9d0653e47045dc09495210ff01e4e164317407d19d8abd12
        auth:   sha1  a18c972688001670905a0de1d85e6383e79d4aad
      outbound
        spi: 4e200a54
        enc:     aes  d7a420011bf1b1e7408915e60a02e9eed4fdee6124bd9266d43a5e2f4e3f4ea2
        auth:   sha1  58f2788cf82545e5938a95fd421f5ab9828505b3
      NPU acceleration: encryption(outbound) decryption(inbound)

fd-wv-fw04 #
fd-wv-fw04 #
fd-wv-fw04 # get router info routing-table static
S*      0.0.0.0/0 [10/0] via 172.16.1.1, wan1
S       192.168.29.0/24 [10/0] is directly connected, fritzbox
S       192.168.121.0/24 [10/0] is directly connected, fd-wv-fw02
S       192.168.131.0/24 [10/0] is directly connected, fd-wv-fw03


 Following is a step-by-step tutorial for a site-to-site VPN between a Fortinet FortiGate and a Cisco ASA firewall. I am showing the screenshots of the GUIs in order to configure the VPN, as well as some CLI show commands. Since the Cisco ASA only supports policy-based VPNs, the proxy-IDs (phase 2 selectors) must be used …
  Similar to my test with Diffie-Hellman group 14 shown here I tested a VPN connection with the elliptic curve Diffie-Hellman groups 19 and 20. The considerations why to use these DH groups are listed in the just mentioned post – mainly because of the higher security level they offer. I tested the site-to-site IPsec connections …
  Just for fun some more VPN throughput tests, this time for the late Juniper ScreenOS firewalls. I did the same Iperf TCP tests as in my labs for Fortinet and Palo Alto, while I was using six different phase1/2 proposals = crypto algorithms. The results were as expected with one exception. The Lab I used …
  Towards the global IPv6-only strategy ;) VPN tunnels will be used over IPv6, too. I configured a static IPsec site-to-site VPN between a Palo Alto Networks and a Fortinet FortiGate firewall via IPv6 only. I am using it for tunneling both Internet Protocols: IPv6 and legacy IP. While it was quite easy to bring the …
  And one more IPsec VPN post, again between the Palo Alto Networks firewall and a Fortinet FortiGate, again over IPv6 but this time with IKEv2. It was no problem at all to change from IKEv1 to IKEv2 for this already configured VPN connection between the two different firewall vendors. Hence I am only showing the …
  A few month ago I published many Layer 2/3 challenges on my blog. Beside the happy feedback I got some remarks that the challenges were to easy at all because you only needed the display filter at Wireshark while no deep protocol knowledge. Ok, “challenge excepted” ;) here I have some more protocol related challenges …
  It is probably one of the most used protocols in my daily business but I have never captured it in detail: IKE and IPsec/ESP. And since IKEv2 is coming I gave it a try and tcpdumped two VPN session initiations with IKEv1 main mode as well as with IKEv2 to see some basic differences. Of …
  Almost 4 weeks ago I published a pcap file with some challenges – this time four falsified configured IPsec VPN connections. If you have not solved it by now you should first download the pcap file and should give it a try. Remember the scenario: You need to prove that the wrong VPN settings are …
  The most common transition method for IPv6 (that is: how to enable IPv6 on a network that does not have a native IPv6 connection to the Internet) is a “6in4” tunnel. Even other tunneling methods such as Teredo or SixXS are found on different literatures. However, another method that is not often explained is to …
  Hier kommt ein kurzer Guide wie man ein Site-to-Site VPN zwischen einer FortiGate Firewall und einer AVM FRITZ!Box aufbaut. Anhand von Screenshots zeige ich die Einrichtung der FortiGate, während ich für die FRITZ!Box ein Template der *.cfg Konfigurationsdatei bereitstelle. Labor Mein Labor sah wie folgt aus: Die FRITZ!Box ist eine 7390 mit FRITZ!OS 06.30, während …
  For a basic remote access VPN connection to a Palo Alto Networks firewall (called “GlobalProtect”), the built-in VPN feature from Android can be used instead of the GlobalProtect app from Palo Alto itself. If the additional features such as HIP profiling are not needed, this variant fits perfectly. I am showing a few screenshots and …
  In my previous blogpost I talked about the true random number generator (TRNG) within the Raspberry Pi. Now I am using it for a small online pre-shared key (PSK) generator at https://random.weberlab.de (IPv6-only) that you can use e.g. for site-to-site VPNs. Here are some details how I am reading the binary random data and how …